My Wordpress to Hugo Migration #2 — Hosting
TL;DR — I migrated my self-hosted Wordpress in June 2019 to a static site generator (Hugo) hosted using AWS services. I only finalized my hosting and publication workflows in April 2020. In this series of 4 articles, I will describe the motivation to change, the challenges, but also how I’m hosting my blog and what my publication workflow looks like.
- Why switching from Wordpress to Hugo?
- Hosting a static website < this article! \o/
- Switching to Hugo
- Publication workflow
Why AWS
Once I decided to move from Wordpress to Hugo, the next big question was: where will I host my new blog? Because Hugo renders static websites, I’m able to host it virtually anywhere. Also, my content becomes very portable. Some popular hosting solutions are described in the Hugo documentation.
The most natural solution would have been to use free alternatives such as GitHub Pages or GitLab Pages. I could also have continued with my server, but this was an excellent opportunity to learn something new. The last thing that tipped the scales was a key factor: learning more of AWS was on my bucket list.
The way I’m currently hosting my blog and managing my resources is quite different from the initial version; I’m describing my journey below, hoping it can help others.
AWS Journey
I started first by spending some time understanding how to host a static website in a performant and secured manner using only AWS services. Multiple options are available:
- Using EC2
- Single instance
- Multiples instances with a load balancer
- Using S3
- Leveraging S3 Website Hosting capability
- With CloudFront as a CDN fronting an S3 bucket
Note that I immediately excluded services such as Amazon Lightsail or AWS Amplify that are oriented to different needs.
I already had a dedicated server hosting my Wordpress, so I didn’t see any benefits switching to EC2.
I decided to go for a combination of S3 and CloudFront, and I started my testing. Just hours after my first try, I realized that this would not be straightforward. 😅
When you’re only looking through the (AWS) window or reading blog articles about the topic, everything can look easy and great. The reality is…well, hum, different interesting. :)

Let’s first write down the following statements that I discovered during this initial phase:
- All AWS services are not available in all regions.
- Some services require a specific region (e.g.,
us-east-1): this is the case, for example, for ACM when you require HTTPS between viewers and CloudFront. - The AWS console is not aligned to the AWS API: some actions in the console can do “hidden” things in the backend (such as adding permissions to a role, etc.).
Those facts may be obvious for some of you, but for me, it was not.
Hosting — Version 1
Being somehow familiar with some AWS concepts, I knew I had to focus on the following services to build an MVP:
- Storage: AWS S3
- DNS: AWS Route53
- SSL: AWS Certificate Manager
- CDN (Content Delivery Network): AWS CloudFront
I initially deployed everything manually using the AWS console. Without going too much into details, you can find below the main steps to host a static website using AWS S3 and CloudFront:
- Domain name: obviously, you need to have a domain name registered. 😉 Note: this can be done using any registrar.
- You will need an AWS account to begin provisioning resources to host your website.
- Route 53: set up a public hosted zone with Route 53 and change the existing NS records in your domain settings of your name registrar (this step is not required if you bought your domain from AWS).
- Create a free SSL wildcard certificate using ACM (AWS Certificate Manager)…yes, free! Important: the certificate must be requested in the
us-east-1(N. Virginia) region. ACM certificates in this region that are associated with a CloudFront distribution are distributed to all the geographic locations configured for that distribution. - S3
- Create a first S3 bucket to store log files: you can select the region of your choice.
- Create a second S3 bucket to store website files: you can select the region of your choice.
- Enable the website hosting feature: in the bucket properties, navigate to the ‘Static website hosting’ card, select the ‘Use this bucket to host a website’ and fill the information.
- You can find some tutorials/articles saying that it is critical to name your S3 bucket as your website domain name: that’s only true if you’re using only the S3 website hosting and not CloudFront in front of it. If you’re using CloudFront, you can name your S3 bucket whatever you want (still by respecting S3 naming rules and constraints): mine is named
cloudmaniac.net-rootfor example. - Edit the bucket permissions to restrict their access.
- Funny fact: I discovered that I still had a 12 years old S3 bucket that I created to store some data back in 2006. It’s like when you discover some money in a jacket you didn’t wear for years.
- Create a CloudFront distribution.
- Create a record set in Route 53, which maps the CloudFront distribution domain name your website domain name. This is often referred to as a CNAME record in DNS.
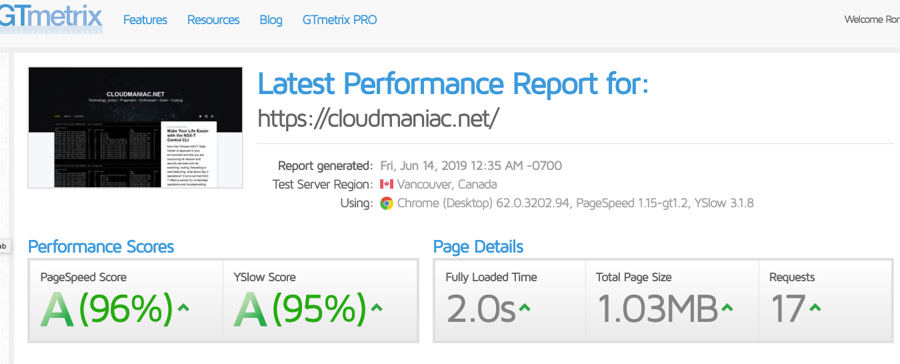
That’s it! My blog was finally online (and super fast), and I was able to upload my static content in my S3 bucket using the AWS S3 Console.
Hosting — Version 2
It didn’t take long until I decided to build a 2nd version with the following changes:
- Publication workflow update
- I switched from using the AWS S3 console to publish new content (basically with drag and drop into my S3 bucket) to syncing my Hugo
publicfolder to my S3 bucket using AWS CLI:aws s3 sync public s3://<my-super-duper-s3-bucket>. - A second CLI allowed me to create a CloudFront invalidation:
aws cloudfront create-invalidation --distribution-id <ID> --paths "/*".
- I switched from using the AWS S3 console to publish new content (basically with drag and drop into my S3 bucket) to syncing my Hugo
- HTTP 301 redirection (to redirect
www.cloudmaniac.nettocloudmaniac.net). To achieve that, I had to create:- A 3rd S3 bucket with static website hosting configured to redirect requests to
cloudmaniac.net. - A 2nd CloudFront distribution configured with
www.cloudmaniac.netto act as a front to that 3rd S3 bucket.
- A 3rd S3 bucket with static website hosting configured to redirect requests to
- S3 bucket permissions to force users to go through the CDN.
I need to expand a little on that last item: in a CloudFront distribution, you specify origin servers, such as an S3 bucket or your own HTTP server, from which CloudFront gets your files which will then be distributed from CloudFront edge locations all over the world. There are 2 ways to configure the origin when using an S3 bucket: by using the S3 website endpoint or the S3 endpoint (also known as the REST API endpoint). Did you spot the difference? :)
- S3 website endpoints use this format:
<bucket-name>.s3-website.<region>.amazonaws.comor<bucket-name>.s3-website-<region>.amazonaws.com. - S3 endpoints use this one:
<bucket-name>.s3.<region>.amazonaws.com.
Most of the documentation available will tell you to enter the S3 website endpoint as the Origin Domain Name in the origin settings for your CloudFront distribution. By doing that, CloudFront is acting as a HTTP reverse proxy as you’re using the website endpoint for origin (with anonymous access allowed). This configuration allows public read access on your website’s bucket and people will still be able to browse the content using the S3 website endpoint, e.g., https://bucket-name.s3-website.<region>.amazonaws.com.
There is a 2nd option: using the S3 REST API endpoint as the origin with access restricted by an OAI (Origin Access Identity). With that method, it is possible to allow access to your S3 bucket only from a CloudFront distribution by adding an OAI to your distribution. Then, you can update your bucket policy and S3 ACL to be sure that:
- Only the OAI can access your bucket.
- CloudFront can access the bucket on behalf of requesters.
- Users can’t access the objects in other ways, such as by using Amazon S3 URLs.
More info on that here.
Using the S3 REST endpoint to fetch content from your origin presents some challenges: the S3 REST endpoint does NOT support redirection to a default index page.
CloudFront does allow you to specify a default root object (index.html), but it only works on the root of the website (such as http://www.example.com > http://www.example.com/index.html). It does not work on any subdirectory (such as http://www.example.com/about/). If you were to attempt to request this URL through CloudFront, CloudFront would do an S3 GetObject API call against a key that does not exist.
This may be fine when CloudFront is used as a pure CDN for static files such as CSS or images, but it’s unrealistic when used with a blog or a website. Amazon suggests a workaround that consists of inspecting requests using a Lambda@Edge function.
I followed the suggestion and created a Lambda@Edge (triggered by the distribution) to re-write requests so that CloudFront requests a default index object for subfolders (e.g., index.html).
Hosting — Version 3
I was quite happy with how things were configured at that moment. However, I was missing a way to manage the lifecycle of my AWS resources. As I was learning Terraform at that moment, it was a natural extension to use it.
Remember that I said that the AWS console is not aligned with the API? Here’s come the challenge: when using a framework such as Terraform, you will need to create and manage more resources (and differently) compared to the AWS Console. Also, some AWS features or configuration options are missing from the AWS provider.
Long story short, I updated my Terraform configuration multiple times and ended up creating a module that manages AWS resources configuration for me.
You can find my Terraform Module on Terraform Registry: AWS Static Website Terraform Module.
The only requirements to use it are:
- An AWS account.
- Your domain already configured as a hosted zone on Route53.
The final touch was the adoption of Terraform Cloud: I’m using it for its remote state management as well as the version control system (VCS) integration.
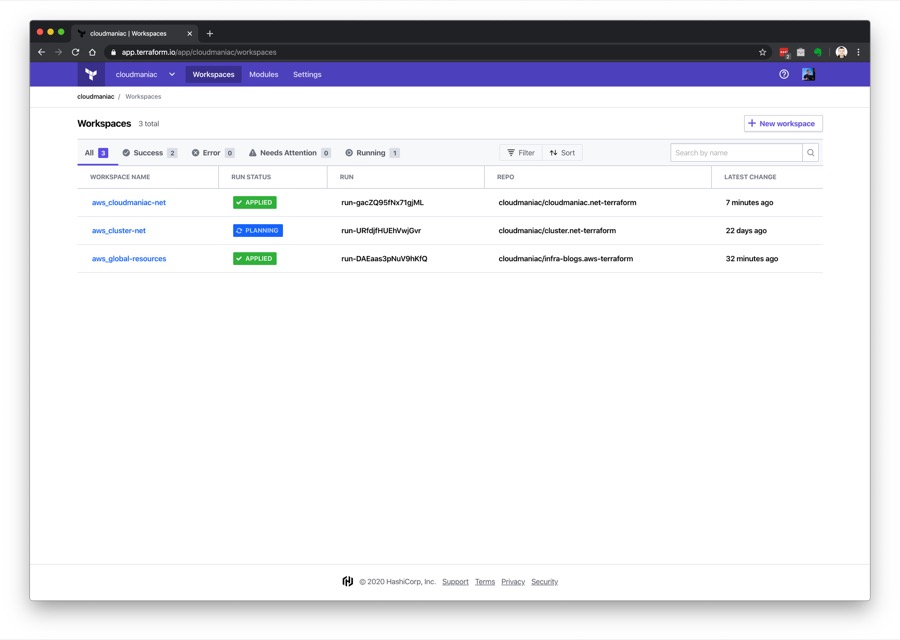
I’m using multiple workspaces to manage multiple blogs; as I linked those workspaces to private repositories on GitHub, Terraform Cloud can automatically initiate Terraform runs when changes are committed to specified branches.
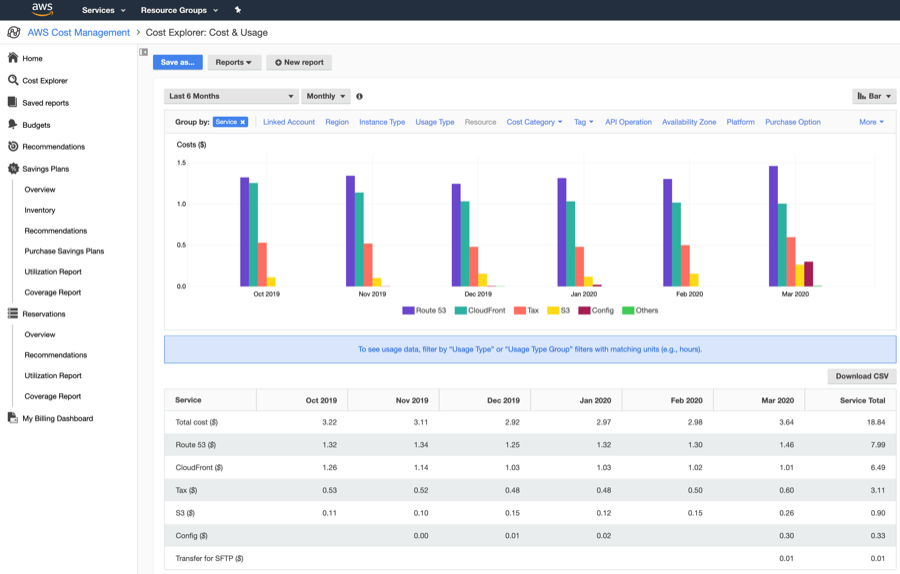
Hosting Cost
Since I published my first article, a few people reached out to me, asking how much I’m spending in AWS services for my blog. Below is a screenshot of my billing dashboard. Please note that I have a 2nd blog (mainly used for testing), so the price can almost be divided by 2.
Resources
- Whitepaper — Hosting Static Websites on AWS
- Key differences between a website endpoint and a REST API endpoint
- Implementing Default Directory Indexes in Amazon S3-backed Amazon CloudFront Origins Using Lambda@Edge
I will cover the switch from Wordpress to Hugo in details in the 3rd article of the series. Stay tuned!