Getting Started with VMware Project Photon
Containerization is one of the subject which is getting the most attraction at the moment. It’s not only a geek trend, major actors are using containers in production. After all, Google was starting over 2 billion containers per week…exactly one year ago, in May 2014. Two billion containers per week…that’s 3300 containers per second! :)

VMware presented last week two new open source projects that will help their customers to build, run and manage their cloud-native applications.
-
Project Lightwave (not yet publicly available) is a container identity and access management technology.
-
Project Photon is a lightweight Linux operating system for containerized applications.
VMware Project Photon
Before switching on more advanced posts, this post will provide configuration guidance for first steps with Photon.
-
How to run Photon
-
Enable SSH Root Access
-
Install Additional Softwares
-
Configure a Static IP
-
Start Docker Daemon
-
Allow Docker Remote Access
-
Install Rocket
NB: all these steps detailed here shall not be duplicated into production without considering every aspects of the design, especially security concerns.
![]()
Photon is an open source minimal Linux container host runtime and supports the most common containers format such as Docker, rkt and Garden from Pivotal. Designed to have a small footprint, Photon is extensible, lightweight and optimized for vSphere and vCloud Air.
Note: Photon is a Technology Preview and is currently only supported through community efforts and direct developer engagements in the community.
Installation
First, you have to decide how you want to run Photon:
-
Use the pre-built ISO image (available on Bintray) to install on the platform of your choice:
-
Use a HashiCorp Vagrant box.
-
Build your own Photon ISO image by cloning Photon GitHub source repository.
In an installation context, steps are quite straightforward:
-
Accept license agreement,
-
Select installation type,
-
Select installation disk,
-
Enter a hostname,
-
Enter a password,
-
Go for a coffee.
On second thought, don’t go for a coffee, installation is ridiculously quick…I mean really quick! We are talking seconds here, not even minutes. :)
You have 4 different options in step 2, each of them providing a different runtime environment:
* Photon OS (Micro): Photon Micro is a completely stripped down version of Photon that can serve as an application container, but doesn’t have sufficient packages for hosting containers. This version is only suited for running an application as a container. Due to the extremely limited set of packages installed, this might be considered the most secure version.
-
Photon Container OS (Minimum): Photon Minimum is a very lightweight version of the container host runtime that is best suited for container management and hosting. There is sufficient packaging and functionality to allow most common operations around modifying existing containers, as well as being a highly performant and full-featured runtime.
-
Photon Full OS (All): Photon Full includes several additional packages to enhance the authoring and packaging of containerized applications and/or system customization. For simply running containers, Photon Full will be overkill. Use Photon Full for developing and packaging the application that will be run as a container, as well as authoring the container, itself. For testing and validation purposes, Photon Full will include all components necessary to run containers.
-
Photon Custom OS: Photon Custom provides complete flexibility and control for how you want to create a specific container runtime environment. Use Photon Custom to create a specific environment that might add incremental & required functionality between the Micro and Minimum footprints or if there is specific framework that you would like installed.
Notes:
-
have a look at the different packages list files here to check which packages are installed with the micro / minimal versions.
-
if you’re missing a package, you can always add it later with
tdnf.
Congratulations! VMware Project Photon is now running.
Enable SSH Root Access
By default, SSH login is restricted and root is not allowed to connect. To change this behavior, open /etc/ssh/sshd_config to uncomment the following line:
#PermitRootLogin yes
Restart the SSH daemon with systemctl.
systemctl restart sshd
Install Additional Softwares
Photon comes with tdnf (Tiny Dandified Yum) as default package manager. You can install additional package almost the same way you are using yum, by using ‘tdnf <command>’ instead of ‘yum <command>’. For example:

Repositories are configured in /etc/yum.repos.d: you can list those enabled with tdnf repolist.
More info on GitHub here and here. All dnf commands are described in the documentation.
Configure a Static IP
By default, your Photon instance is deployed with DHCP configured on eth0 interface. To configure a static IP, you have to edit /etc/systemd/network/10-dhcp-eth0.network to match the following parameters (don’t forget to rename the file to avoid any confusion).
[Match]
Name=eth0
[Network]
Address=<IP>/<NETMASK>
Gateway=<GATEWAY>
DNS=<DNS-SERVER>
Domains=<DOMAIN>
For example:
[Match]
Name=eth0
[Network]
Address=192.168.76.130/24
Gateway=192.168.76.254
DNS=192.168.76.10
Domains=cloudmaniac.net
 Start Docker Daemon
By default, Docker is installed but not started. Use systemctl to initialize and start the Docker engine:
systemctl start docker
To ensure docker daemon service will start on boot, enter:
systemctl enable docker
Finally, to check docker engine status and have a look at the last logs:
systemctl status docker
Allow Docker Remote Access
By default, Docker is only available locally through a UNIX socket (unix:///var/run/docker.sock). If you want to consume and manage containers remotely (via its API for example), you have to make docker daemon to listen on a specific IP and port. Edit either /lib/systemd/system/docker.service or /etc/systemd/system/multi-user.target.wants/docker.service.
Note: the second is a symbolic link of the first as you can see on the following screenshot.
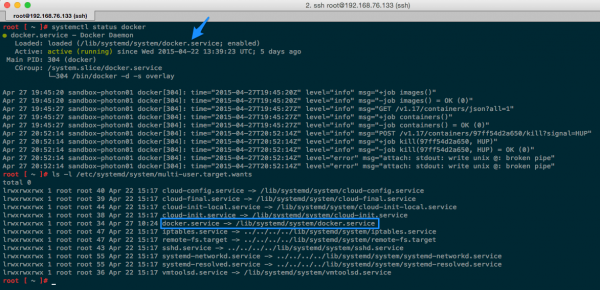
You should have the following configuration.
[Unit]
Description=Docker Daemon
[Service]
ExecStart=/bin/docker -d -s overlay
ExecReload=/bin/kill -HUP $MAINPID
KillMode=process
Restart=always
[Install]
WantedBy=multi-user.target
To allow remote connection to docker daemon, add -H unix:///var/run/docker.sock -H tcp://0.0.0.0:2375 to the line starting with ExecStart.
[Unit]
Description=Docker Daemon
[Service]
ExecStart=/bin/docker -d -s overlay -H unix:///var/run/docker.sock -H tcp://0.0.0.0:2375
ExecReload=/bin/kill -HUP $MAINPID
KillMode=process
Restart=always
[Install]
WantedBy=multi-user.target
Notes:
-
When nothing is specified, the Docker daemon listens by default on
unix:///var/run/docker.sockto allow only local connections by the root user, -
The -H option make the Docker daemon listen on a specific IP and port or unix socket,
-
2375 is Docker default port but you can use any other port.
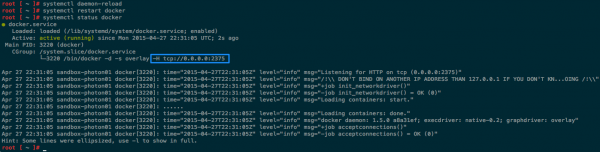
To verify your configuration, use the systemctl status docker command to check that the docker daemon is now listening for external connexions on port 2375.
Install Rocket
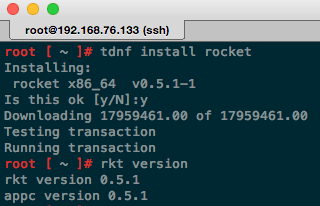
![]() Rocket (rkt) is another container runtime, which is positioned as an alternative (or sometimes even as a challenger) to Docker’s libcontainer capability. The first version of rkt was released by CoreOS team in December 2014. While Docker supervises containers via its daemon, Rocket doesn’t follow the same principle and launch each process independently.
Rocket (rkt) is another container runtime, which is positioned as an alternative (or sometimes even as a challenger) to Docker’s libcontainer capability. The first version of rkt was released by CoreOS team in December 2014. While Docker supervises containers via its daemon, Rocket doesn’t follow the same principle and launch each process independently.
To install rkt on Photon, enter tdnf install rocket.
Resources
-
VMware Photon Official Page: https://vmware.github.io/photon
-
Photon GitHub: https://github.com/vmware/photon
-
Photo FAQ: https://github.com/vmware/photon/wiki/Frequently-Asked-Questions
-
Official Photon ISO Download: https://bintray.com/vmware/photon/iso/view
-
Cloud-Native Apps at VMware: http://vmware.com/photon